No products in the cart.
Return To Shop
Drip Irrigation Maintenance and Troubleshooting
Drip Irrigation Maintenance and Troubleshooting gives you knowledge about the safe operation of drip irrigation system .
Drip Irrigation System
Introduction
Drip irrigation refers to the application of water in small quantities at the rate of mostly less than 12 lph as drops to the zone of the plants through a network of plastic pipes fitted with emitters. Drip irrigation in its present form has become compatible with plastics that are durable and easily molded into a variety and complexity of shapes required for pipe and emitters.
MERITS
1) Increased water use efficiency
2) Better crop yield
3) Uniform and better quality of the produce
4) Efficient and economic use or fertilizer through fertigation
5) Less weed growth
6) Minimum damage to the soil structure
7) Avoidance of leaf burn due to saline soil
8) Usage in undulating areas and slowly permeable soil
9) Low energy requirement (i.e.) labor-saving
10) High uniformity suitable for automatization
DEMERITS
1) Clogging of drippers
2) Chemical precipitation
3) Salt accumulation at the wetting front
Maintenance Of Drip Irrigation System
The maintenance of a drip irrigation system is very essential for its successful functioning.
SAND FILTER
Backwash the sand filter to remove the silt and other dirt accumulated. Figure 1 shows the sand filter in normal filtration mode and in Figure 2 shows the Backwash mode.
Backwash allows the water to come out through the lid instead of a backwash valve. Stir the sand in the filter bed up to filter candle without damaging them. Whatever dirt is accumulated deep inside the sand bed, will get free and goes out with the water through the lid.
a) Backflush sand filter every day before starting the system and possibly
before stopping irrigation
b) Do not allow pressure difference across the sand filter more than 0.30
ksc
c) Backflush at a pressure of 0.5 ksc to avoid loss of sand till clean water comes
SCREEN FILTER
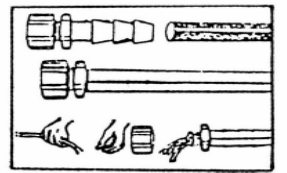
Refer to Figure 3. Open the flushing valve on the filter lid so that the dirt and silt will be flushed out. Open the filter and take out the filter element. Clean it in flowing water. Take out the rubber seals and clean them from both sides. Care should be taken while replacing the rubber seals, otherwise, they might get out.
a) Clean screen tilter everyday
b) Do not allow pressure difference across filter more than 0.2 ksc
c) Open the drain valve to remove impurities before cleaning
d) Use thin water jet/nylon brush to clean the filter element
e) Do not use stones to rub the screen surface
f) Check for any mechanical damage
g) Never use the system without filter element inside the filter
DAILY MAINTENANCE
a) Clean the sand and screen filters for 5 minutes before starting the
system
b) Ensure all drippers are working properly without any leakage
c) Before stopping irrigation, backwash the sand filter for about 5 minutes
WEEKLY MAINTENANCE
a) Clean the sand filter by hand
b) Flush the sub-main by opening the flush valve for 5 minutes
c) Flush laterals 5 numbers at a time for 5 minutes
MONTHLY MAINTENANCE
a) Treat the system with chlorine/acid.
Note: The frequency of chemical treatment depends on the degree of a problem at the site.
CHEMICAL TREATMENT
Clogging or plugging of drippers may be due to precipitation and accumulation of certain dissolved salts like carbonates, bicarbonates, Iron, Calcium and Manganese salts. The clogging is also due to the presence of microorganisms and the related Iron and Sulphur slimes due to algae and bacteria.
The clogging is usually avoided/cleared by chemical treatment of water. Chemical treatments commonly used in drip irrigation systems include the addition of chloride and/or acid to the water supply.
ACID TREATMENT
Hydrochloric Acid (HCl) is injected into drip systems at the rate suggested. The acid treatment is performed till a pH of 4 is observed and the system is shut down for 24 hours. The next day the system is flushed by opening the flush valve and lateral ends.
CHLORINE TREATMENT
Chlorine treatment in the form of bleaching powder is performed to inhibit the growth of organisms like algae, bacteria. The bleaching powder is dissolved in water and this solution is injected into the system for about 30 minutes. Then the system is shut off for 24 hours. After 24 hours the lateral ends and flush valves are opened to flush out the water with impurities. Bleaching powder can directly be added into the water source at a rate of 2 mg/liter or through ventury assembly.
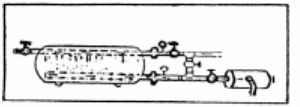
Sand Filter: Filtration Mode
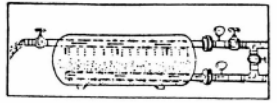
Sand Filter: Backwash Mode
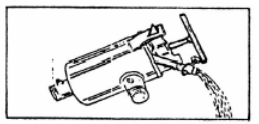
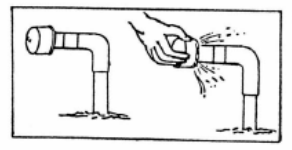
Flushing of the Screen Filter Caps
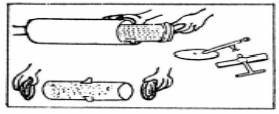
Cleaning of Screen Filter Rubber
Flushing of Sub-mains
Flushing of Lateral
Fig. 1.8 Maintenance of Micro-irrigation Components
Drip Irrigation System Troubleshooting
| Sr.No | Problems | Causes | Remedies |
| 1) | Leakage of water at the joint between sub main and lateral | Damaged Joints | Correct Damages. |
| 2) | Leakage in the polytube | Damage of polytube by farming activity/ rats. | Block the holes by Goof plug. |
| 3) | Water not flowing up to Lateral end | Holes in Laterals. Cuts in Laterals, Bent in Laterals | Use Polyjoiners at cuts, close the holes and cuts, Remove the Bends |
| 4) | Outcoming of the white mixture on removing the end plug | More Salinity in water. Uncleaned Laterals. | Remove the Endcaps. Clean the Laterals Fortnightly |
| 5) | Underflow or Overflow from Laterals | Clogging of drippers. Unclosed End plug | Clean the sand and screen filters. Close end caps |
| 6) | Oily gum material comes out on opening the lateral end | More algae or ferrous material in water | Clean the laterals with water or give chemical treatment |
| 7) | More pressure drop-in filters | Accumulation of dirt in filters | Clean filters every week. Backwash the filters for every 5 minutes daily. |
| 8) | Pressure gauge not working | Rainwater entry inside. Corrosion in gauge pointer damage | Provide plastic cover and fix pointer properly. |
| 9) | Drop-in pressure | Leakage in a main opened outlet. The low water level in well. | Arrest the leakage and close outlet. Lower the pump with reference to well water level |
| 10) | More pressure at the entry of sand filter | No bypass in the pipeline/bypass not opened. Displacement of filter element. Less quantity of sand in filters | Provide bypass before filter and regulate pressure. Place the filter element properly. Fill the required quantity of sand |
| 11) | Accumulation of sand and debris in screen filter | Displacement of filter element. Less quantity of sand in filters | Place filter element properly. Fill required quantity of sand |
| 12) | Ventury not working during chemical treatment and fertigation | Excess pressure on filters Improper fitting of ventury assembly | Bypass extra water to reduce pressure. Repair the ventury assembly. |
| 13) | Leakage of water from air release valve. | Damaged air release valve ring. | Replace the damaged ring. |


Leave a reply